If you are willing to be smart and successful in your approach for scanning the documents with your iOS device, then you are at the right place. It is the suitable time to explore how to use the Notes app and make use of the best suggestions to scan documents as per your requirements. The document scanner of the Apple is hidden inside the Notes application. This system supports in-app sharing. An easy way to store the newly scanned document anywhere gives different benefits for users of this application. All users of iOS devices will get a good improvement in their lifestyle and they will get an array of benefits from a proper use of features of their mobile devices.
Step by step guidelines
Everyone with an expectation to use the document scanner Notes in the iOS device can focus on the following details. They make a good decision about how to scan the documents based on their requirements.
- Open Notes app in the iOS device
- Create a new note or tap on an existing note to add a document to it
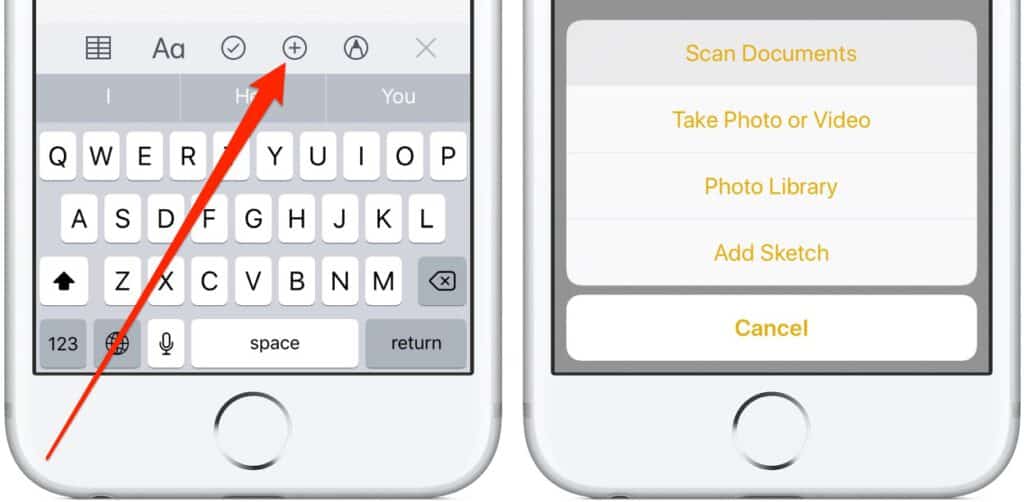
- Access the camera by tapping the button at the screen’s bottom or above the keyboard
- Tap scan documents
- Line up the document you like to scan
- Tap the shutter button when the scanner is not automatically scanning the document. Repeat this step for all documents you like to scan
- Tap Save after you successfully scanned all the documents. The button will include a count of the total number of pages you have scanned.
Follow suggestions from experts
All beginners to the iOS devices are willing to know about easy methods to use all features and facilities in their mobile devices. They have to make certain how to scan documents in the Notes application. They can open a new note or existing one. Now, they can tap the camera icon and then tap the Scan Documents.
The next step is to place their document in the view of the camera. They must use the auto-capture choice by bringing the doc into the viewfinder. They can also use one of the volume buttons or shutter button to capture the scan. They have to adjust the scan’s corners by dragging. They can tap Keep Scan and scan as many pages as they require. They must tap save button located in the bottom right corner.
Use one of the best options and scan documents in your iOS device
There are several choices to scan documents in the iOS devices. For example, you can scan documents right into the popular Files app and get them into your Mac, iCloud, or any other device. You can tap the 3-dot icon in the top right and Scan Documents when you open the Files app. As compared to using any other method for scanning documents in the iOS device, you can prefer and use the Notes app. This is because you can get more than expected benefits. Notes app is very helpful to iOS users to scan any size of the document.
If you like to conveniently scan the large documents, then you can use the Notes app. You do not get the best result when you use the traditional scanner for scanning the large documents which can be goofy to scan. This is worthwhile to tap a bit away from the complete magnifying glass in all corners and drag where you wish it to be.
An easy way to access and also use the Camera flash and filters while scanning the documents are the main benefits for all users of the Notes app in the iOS device. You can alter the settings at the top of the screen based on your requirements at any time.
Individuals who have scanned the documents can edit such documents with no complexity and delay. They can do it by accessing the scanned documents and bring up the editing toolbar located at the screen’s bottom to add pages, rotate, crop, and change filter. They can also tap the share button located at the top right corner within the scanned documents and to do several things like the markup, markup as PDF, share, copy, and print documents.
