Automation testing has emerged as a vital component in the realm of software development, playing a crucial role in ensuring the quality and reliability of applications. To meet this demand, the combination of Selenium and TestNG has proven to be a formidable force, offering developers a powerful solution for effective test automation. Selenium, a widely adopted open-source automation testing framework, seamlessly integrates with TestNG, a robust testing framework designed specifically for Java, resulting in a comprehensive toolset for streamlined and dependable test automation.
Selenium, renowned for its versatility and flexibility, empowers developers to automate web browsers, replicate user interactions, and validate the expected behavior of web applications. Supporting multiple programming languages, Selenium testing caters to a broad range of platforms, enabling developers to create automation scripts tailored to their specific requirements. By automating repetitive testing tasks, Selenium significantly reduces time and effort while maintaining consistent and accurate results.
TestNG, aptly named the “Next Generation” testing framework, complements Selenium by offering an array of advanced features and utilities for Java-based testing. Its intuitive and flexible approach to test management allows developers to effortlessly define test suites, test cases, and test data. In this blog, we will provide a comprehensive guide to getting started with Selenium Automation Testing using TestNG, covering the essential concepts, setup process, and best practices to help you embark on your automation testing journey.
What is the TestNG framework and what are its key features?
TestNG is an advanced and open-source test automation framework specifically designed for Java programming language. It is developed with the aim of providing a next-generation testing solution, incorporating several powerful features and functionalities that set it apart from other frameworks like JUnit and NUnit. TestNG, which stands for “Next Generation,” was created by Cedric Beust and has gained popularity among developers and testers due to its comprehensive set of features and ease of use.
One of the notable advantages of TestNG is its support for multiple annotations, which allows developers to define various test attributes and behaviors with ease. Annotations such as @Test, @BeforeMethod, @AfterMethod, and many more enable developers to specify test cases, setup and teardown methods, and test dependencies.
Crucial Traits of TestNG:
- Comprehensive HTML Reports: TestNG provides detailed and easy-to-read HTML reports, overcoming the limitations of WebDriver in generating such reports.
- Test Case Grouping: TestNG allows grouping multiple test cases together to be executed whenever that specific group is invoked.
- Test Case Prioritization: TestNG enables setting priorities among test cases, determining the order in which they should be executed.
- Rerun Failed Test Cases: TestNG provides the ability to execute only the failed test cases using the testng-failed.xml configuration file.
- Cross Browser Testing and Data Parameterization: TestNG supports cross-browser testing and data parameterization, allowing for greater test coverage and flexibility.
- Parallel Testing: TestNG offers built-in support for parallel testing, allowing test cases to be executed concurrently and reducing overall execution time.
- Easy-to-use Annotations: TestNG utilizes annotations that are easy to understand and control the sequence of execution in automation scripts, eliminating the need for a static main method.
- Exception Handling: TestNG handles uncaught exceptions effectively, preventing abrupt test termination and providing a more robust testing environment.
Understanding Selenium and TestNG
Selenium and TestNG are two powerful tools in the field of software testing that work hand in hand to provide a comprehensive and efficient testing solution.
Selenium is an open-source automation testing framework that allows testers to automate web applications across different browsers and platforms. It provides a wide range of features and functionalities for creating and executing automated test scripts. With Selenium, testers can interact with web elements, simulate user actions, and perform various validations to ensure the quality and functionality of web applications.
TestNG, on the other hand, is a testing framework for Java that is designed to enhance and extend the capabilities of traditional testing frameworks like JUnit. TestNG offers advanced features and utilities that enable testers to write robust and scalable test cases. It provides features such as grouping, dependency management, parallel execution, data parameterization, and HTML reporting, among others. These features make TestNG a powerful tool for organizing and executing test cases efficiently.
When used together, Selenium and TestNG provide a comprehensive testing solution. Selenium helps in automating web interactions and validating application functionality, while TestNG facilitates the organization and execution of test cases, making the testing process more manageable and efficient.
Why use TestNG with Selenium?
TestNG is a powerful testing framework that works seamlessly with Selenium, providing numerous benefits for test automation. Here are some reasons why you should consider using TestNG with Selenium:
- Advanced Annotations: TestNG offers a rich set of annotations that allow you to control the execution flow of your tests. Annotations like @BeforeMethod, @AfterMethod, @BeforeTest, and @AfterTest enable you to set up and tear down test environments, making it easier to manage test execution.
- Dependency Management: TestNG supports defining dependencies between test methods or groups of tests. This means you can specify that certain tests should run only if their dependencies are met. This ensures proper test order and helps maintain test integrity.
- Data-Driven Testing: TestNG provides built-in support for data-driven testing, allowing you to run the same test with multiple sets of test data. By using data providers, you can supply test data from various sources such as Excel sheets, databases, or CSV files. This enables you to increase test coverage and validate different data scenarios.
- Parallel Test Execution: TestNG enables concurrent test execution, running tests in parallel using multiple threads or processes. This significantly reduces test execution time, improves efficiency, and allows for faster feedback on the application’s behavior.
- Test Configuration Flexibility: TestNG allows you to define test configurations using parameters and properties. This enables you to pass dynamic values to your tests, such as browser types, URLs, or environment settings, without modifying the test code. It provides flexibility and reusability in test configurations.
- Flexible Test Grouping: TestNG offers flexible test grouping capabilities, allowing you to categorize tests based on different criteria such as functionality, priority, or environment. This helps in organizing and executing tests selectively, based on specific requirements or testing objectives.
- Reporting and Logging: TestNG provides comprehensive test reports with detailed information about test execution status, failures, and stack traces. It generates HTML or XML reports that are easy to understand and share with stakeholders. TestNG also integrates well with logging frameworks like Log4j, enabling effective log capture and analysis during test execution.
- Incorporation with Other Tools: TestNG seamlessly integrates with other popular tools and frameworks used in the software development ecosystem. It works well with build tools like Maven and Ant, version control systems like Git and SVN, and continuous integration servers like Jenkins and TeamCity. This allows for smooth integration of your Selenium tests into the overall development and delivery process.
By using TestNG with Selenium, you can enhance your test automation efforts, improve test management, and achieve better control and flexibility in your test execution. It enables efficient and reliable test automation, leading to higher software quality and faster release cycles.
TestNG versus JUnit
TestNG and JUnit are both valuable testing frameworks in the Java ecosystem, each with its own set of features and benefits. Testers and developers can choose the framework that best suits their testing needs and preferences to ensure efficient and effective test automation. TestNG offers several advantages over JUnit, making it a superior testing framework in many ways. Some of these advantages include:
- Advanced and Easy Annotations: TestNG provides a rich set of annotations that allow testers to easily define test methods, test classes, test suites, and other configurations. These annotations make it simpler to organize and structure test cases.
- Execution Patterns: TestNG allows testers to define execution patterns for their test cases. They can specify the order of execution, set priority levels, and even group tests to be executed together. This flexibility enables more precise control over the test execution flow.
- Concurrent Execution of Test Scripts: One of the key features of TestNG is its ability to execute tests concurrently. TestNG supports parallel execution, allowing multiple test cases to run simultaneously. This feature can significantly reduce the overall test execution time and improve efficiency.
- Test Case Dependencies: TestNG allows testers to define dependencies between test cases. Test cases can be designed to run only if specific conditions or prerequisites are met. This ensures that tests are executed in the desired sequence, maintaining the required dependencies.
How to Install and Set Up TestNG for Selenium Automation?
To install TestNG in Eclipse, follow these steps:
To install TestNG in Eclipse, download in the system & install Eclipse Integrated Development Environment.
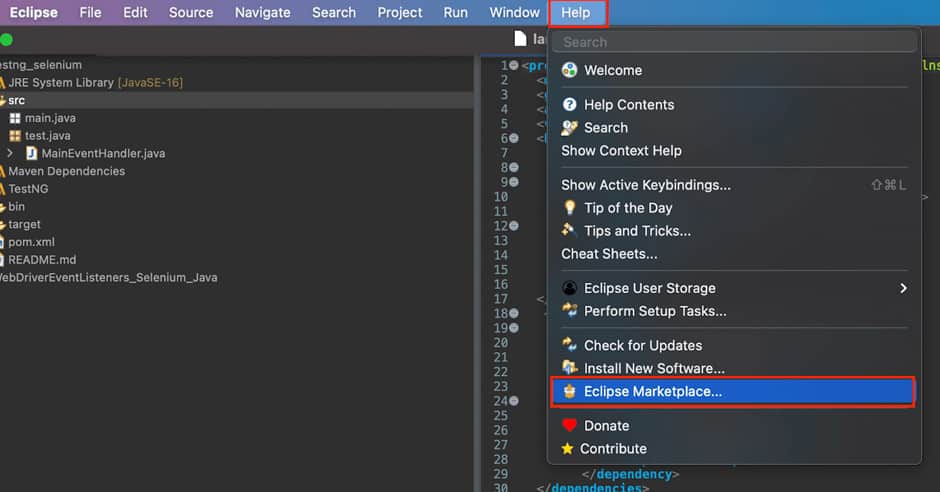
- Open Eclipse IDE on your system, click on the “Help” menu at the top of the Eclipse window & from the dropdown menu, and select “Eclipse Marketplace.”
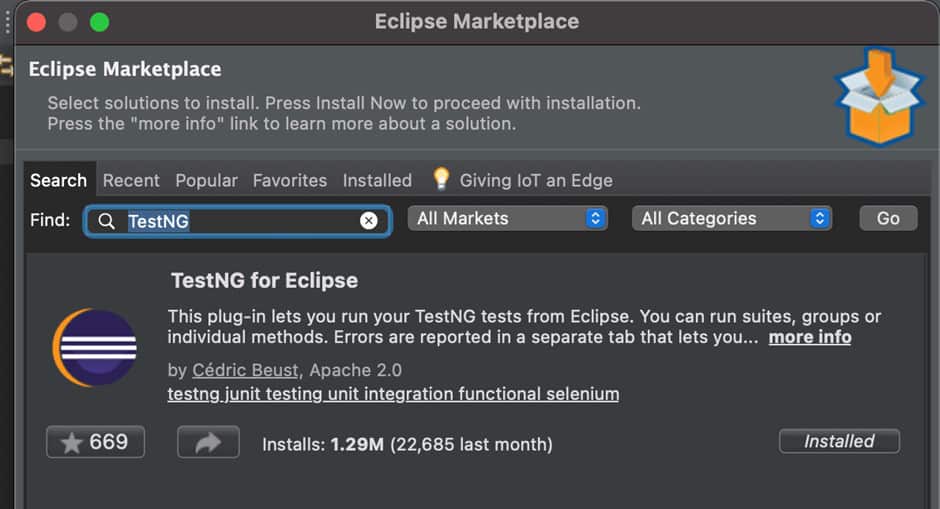
- Step 2 In the Eclipse Marketplace window, type “TestNG” in the search bar located at the top right corner, you will see TestNG in the search results. Click on the “Go” button next to TestNG, and on the TestNG page, click the “Install” button.
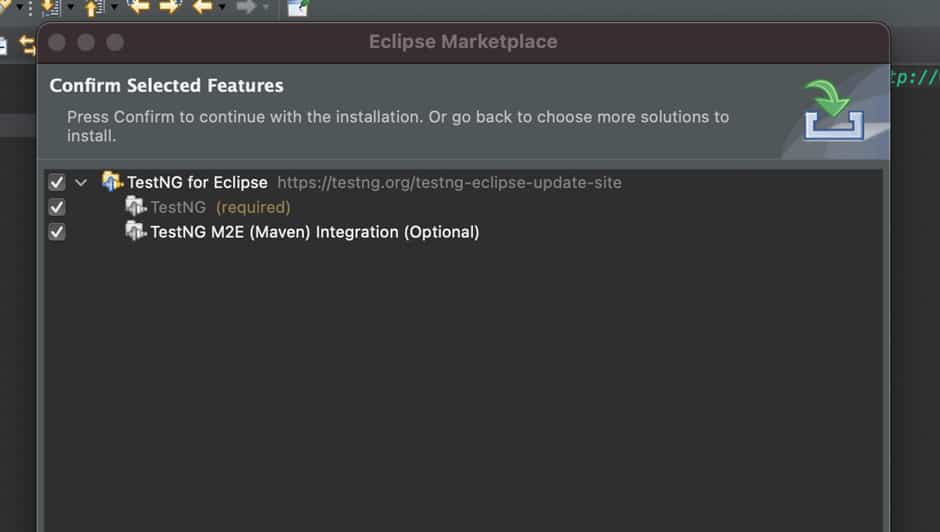
- Step 3: Review the installation details and click “Confirm” to proceed with the installation.
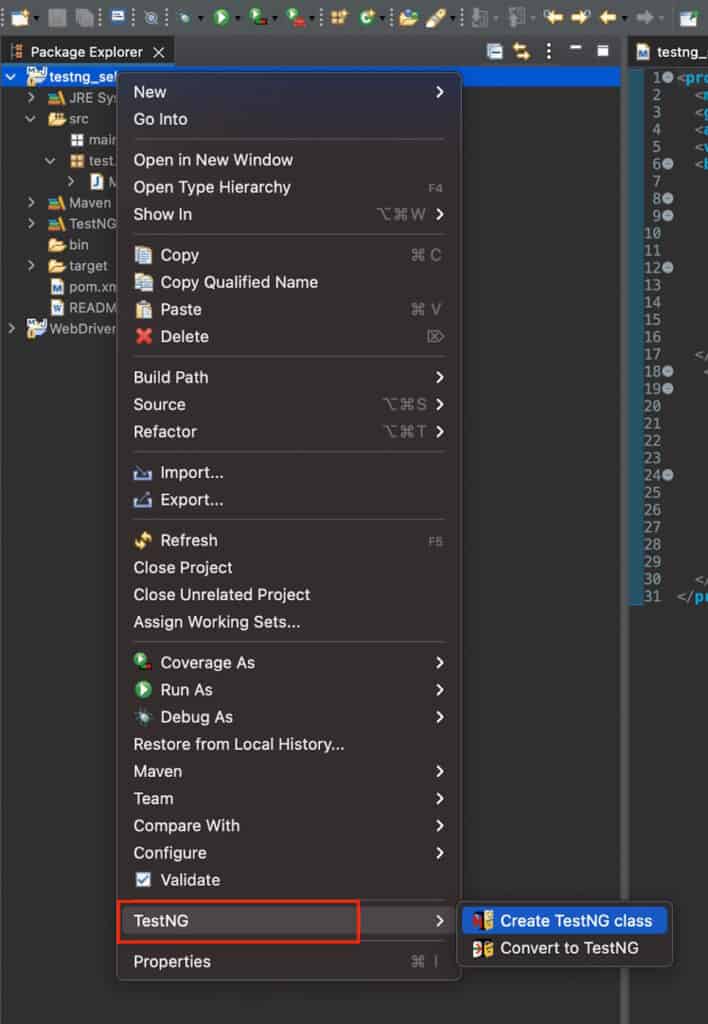
- Step 4: It is adviced to restart Eclipse after the installation is finished for alterations to take effect appropriately. Accept the license agreements and click “Finish.” Wait for Eclipse to download and install TestNG. This may take a few moments.
- Step 5: Once the installation is complete, Eclipse will prompt you to restart the IDE. Click “Restart now” to restart Eclipse. After restarting, TestNG will be successfully installed in Eclipse.
How to write your first TestNG test in Eclipse?
To write your first TestNG test in Eclipse, follow these steps:
- Launch Eclipse and create a new Java project by selecting “File” > “New” > “Java Project” from the menu bar.
- Give your project a name and click “Finish” to create the project.
- Right-click on the newly created project and select “New” > “Class” to create a new Java class.
- Provide a name for your class and make sure to include the necessary package declaration.
- In the newly created class, import the TestNG annotations by adding the following import statement at the top:

- Define a new TestNG test method by annotating a public void method with the @Test annotation. For example:

- Write the test logic inside the test method. This can include interacting with web elements, asserting expected results, etc.
- Save the class by clicking “Ctrl + S” or selecting “File” > “Save” from the menu bar.
- To execute the test, right-click on the class name and select “Run As” > “TestNG Test” from the context menu.
- TestNG will execute the test method and display the test results in the “TestNG Results” view.
Congratulations! You have successfully written and executed your first TestNG test in Eclipse. You can now continue building more complex test cases using TestNG annotations and features.
Remember to leverage the rich set of TestNG annotations, such as @BeforeMethod and @AfterMethod, to set up and tear down test environments, and to ensure proper execution order.
By following these steps, you can start writing and executing your first TestNG tests with Selenium. TestNG’s features and annotations offer flexibility, control, and better test management, helping you build robust and maintainable test suites.
You can enhance your TestNG automation testing by utilizing cloud-based platforms like LambdaTest. LambdaTest serves as a digital experience testing cloud, enabling businesses to expedite their test execution and enhance the deployment cycle. By leveraging LambdaTest, you gain the ability to test your website across more than 3000+ environments, including real device clouds. This comprehensive testing solution has earned the trust of over 10,000+ enterprises for their testing requirements. It’s worth noting that LambdaTest supports all major automation testing frameworks, including Selenium, Appium, Playwright, and more, making it a unified solution for software testing.
What is Parameterization in TestNG?
Parameterization in TestNG refers to the ability to pass parameters to test methods. It allows you to run the same test method multiple times with different inputs, making your test cases more flexible and reusable.
TestNG provides several ways to achieve parameterization:
- Data Providers: TestNG allows you to define data providers that supply test data to your test methods. You can annotate a method with @DataProvider and configure it to return a two-dimensional array of objects representing the test data. Each row of the array represents a set of test data that will be passed to the test method.
- TestNG XML: TestNG also allows you to provide test data using an XML configuration file. You can define parameters in the XML file and associate them with test methods. During test execution, TestNG will substitute the parameter values from the XML file into the test methods.
- DataProviders in TestNG Extensions: TestNG also provides extensions like DataProvider and ExcelDataProvider that allow you to fetch test data from external sources such as databases or Excel files.
Overall, parameterization in TestNG enhances the flexibility and scalability of your test suites by allowing you to vary inputs and execute tests with different sets of data.
Executing TestNG features in Selenium Automation Testing
Implementing TestNG features and utilities in Selenium automation testing can greatly enhance the effectiveness and efficiency of your test suite. Here are some key features and utilities you can utilize:
- TestNG Annotations:
- @BeforeSuite and @AfterSuite: These annotations allow you to set up and tear down resources before and after the entire test suite.
- @BeforeTest and @AfterTest: These annotations enable you to perform setup and cleanup tasks before and after each test case.
- @BeforeClass and @AfterClass: These annotations let you execute setup and cleanup operations before and after each test class.
- @BeforeMethod and @AfterMethod: These annotations enable you to run setup and cleanup tasks before and after each test method.
- TestNG Assertions:
- TestNG provides a variety of assertions like assertEquals, assertTrue, assertFalse, etc., which allow you to validate expected results during your test execution.
- These assertions help you compare actual values with expected values and determine the pass or fail status of your test cases.
- TestNG Data Providers:
- TestNG allows you to use data providers to supply test data to your test methods.
- By annotating a method with @DataProvider, you can define and provide test data in various formats (arrays, 2D arrays, objects, etc.) to be used in your test methods.
- This feature enables you to execute your test cases with different sets of data, increasing test coverage and versatility.
- TestNG Test Suites:
- TestNG enables you to create test suites, which are XML configuration files defining the execution order and dependencies between multiple test classes.
- By specifying the test classes or packages in the suite XML file, you can execute a group of related test cases as a single suite.
- This feature allows you to organize and manage your test cases effectively.
- TestNG Parallel Execution:
- TestNG supports parallel test execution, allowing you to run multiple test classes or test methods concurrently.
- You can configure parallel execution at different levels, such as test suite, test class, or test method.
- Parallel execution can significantly reduce the overall test execution time, especially when running tests on multiple browsers or devices.
- TestNG Reporting:
- TestNG generates detailed test reports in HTML format, providing insights into the test execution status and results.
- The reports include information such as test case names, execution time, pass/fail status, and stack traces for failed tests.
- These reports help you analyze the test results and identify issues or failures quickly.
TestNG’s robust capabilities make it a powerful framework for implementing automated tests with Selenium.
Setting up the Selenium Test Environment
To start with Selenium automation testing using TestNG, you need to follow a few key steps. Here’s a guide to help you get started:
Step 1: Set up your project:
- Create a new Java project in your preferred Integrated Development Environment (IDE) like Eclipse or IntelliJ.
- Configure the project with the necessary Selenium WebDriver and TestNG dependencies. You can manually add the JAR files or use a build management tool like Maven or Gradle.
Step 2: Create a new Java class:
- Create a new Java class that will serve as your test class.
- Import the required packages, including the Selenium WebDriver and TestNG annotations.
Step 3: Set up the Selenium WebDriver:
- Instantiate the appropriate WebDriver class based on your browser choice (e.g., ChromeDriver, FirefoxDriver).
- Set the necessary driver properties and options, such as the browser executable path and desired capabilities.
Step 4: Write your test methods:
- Add the @Test annotation above each test method to indicate that it is a TestNG test.
- Write the test method code, which includes interacting with web elements, performing actions, and making assertions using the Selenium WebDriver.
Step 5: Set up TestNG configuration:
- Create a TestNG XML file (e.g., testng.xml) to configure your test suite.
- Define the test classes or packages containing your test classes in the XML file.
Step 6: Run the TestNG tests:
- Right-click on the XML file or test class in your IDE and select “Run as TestNG Test” or use the TestNG plugin.
- TestNG will execute your test methods and generate a detailed test report.
Step 7: Analyze the test results:
- Once the test execution is complete, you can view the test results in the TestNG report.
- The report provides information about passed and failed tests, along with any associated stack traces.
Step 8: Add more tests and configurations:
- Repeat steps 2 to 7 to add more test classes or test methods to your project.
- You can organize your tests using TestNG features like grouping, dependency management, and parallel execution.
By following these steps, you can start automating your tests using Selenium and TestNG. TestNG provides powerful features for test management, including parallel execution, data-driven testing, and test configuration flexibility. This combination allows you to create robust and scalable test suites for your web applications.
Conclusion
Selenium automation testing with TestNG provides a powerful and versatile solution for creating reliable and efficient test automation frameworks. By following this comprehensive getting started guide, you will gain a solid foundation in Selenium automation testing, learn best practices, and be well-equipped to build robust automated test suites. Embrace the power of Selenium and TestNG, and embark on your journey to streamline your testing process, improve test coverage, and deliver high-quality software products.
Happy Testing!!


